LROC imaging of the Apollo 11 landing site
Decades after the mission, NASA’s Lunar Reconnaissance Orbiter (LRO) photographed Tranquility Base from orbit and resolved the Apollo 11 hardware still on the surface. During LRO’s 2011 low-altitude campaign the orbit was lowered to about 24 km, letting the LROC Narrow Angle Camera image the Apollo sites at roughly 25 cm per pixel — the sharpest views to date. The Apollo 11 frame (NAC M175124932R) is the only direct picture of where Eagle came down and what the moonwalk left behind.
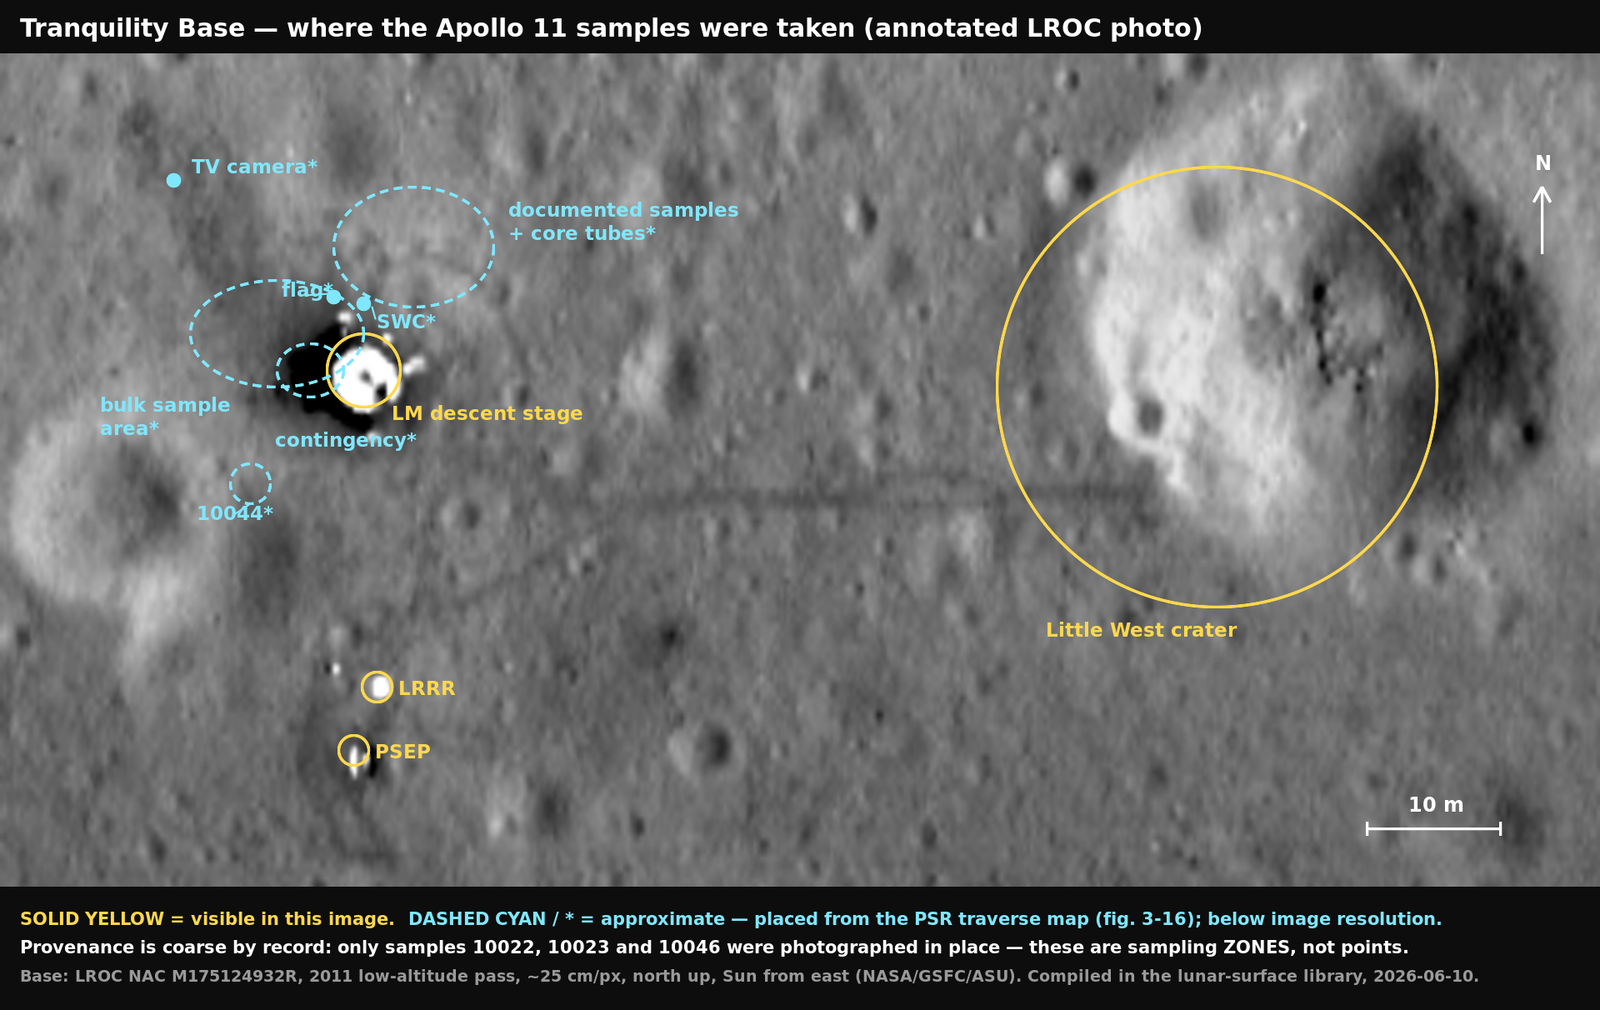
From the Tranquility Base photo-map, built on this frame.
What it resolves
Section titled “What it resolves”- The LM descent stage — the brightest small object in the frame, the lower half of the Lunar Module left as a launch platform, casting a short shadow under the low Sun.
- Astronaut trails — darker, lower-albedo paths of churned regolith radiating from the descent stage, the visible trace of the crew’s movement across the surface during the EVA. One trail runs east to Little West crater (a ~30 m crater ~50–60 m east, which Armstrong jogged to near the end of the EVA).
- The deployed experiments — small bright features south of the descent stage: the Passive Seismic Experiment and the Laser Ranging Retroreflector packages of EASEP, at the end of their own short trails.
- West crater — the large (~180 m), sharp-rimmed, blocky crater at right (east-southeast), the “football-field”-sized crater Armstrong manually flew past on final approach, the LM sitting between its ejecta rays. Measured on this frame (The last three minutes): the descent stage is ≈490 m from the rim crest, ≈575 m (564 m west, 113 m north) from the bowl center, with the bright ejecta apron beginning ≈440 m out along that line. The 1969 record carried two conflicting values — “about 400 m” (Mission Report §11; PSR geology chapter) vs. “130 m north and 600 m west” (PSR soil-mechanics chapter) — and this measurement adjudicates for the latter (ledger A1). Rim-to-rim the crater measures ~160–190 m, favoring the “~180 m” diameter over the “~200 m” also in the record.
Why it matters
Section titled “Why it matters”It is independent ground truth for the 1969 record. During the mission neither the crew nor Mission Control could fix the LM’s position from lunar orbit — Collins spent his solo passes hunting for a glint off Eagle and never found one, and the Mission Report (§11.1.3, §14.1) records that the landing point was only tentatively identified by matching the crew’s description of the avoided blocky crater to West crater. The LROC image confirms — and refines — that geometry: the descent stage sits west of West crater as the mission account says, at the measured stand-off above (settling a 400-vs-600 m disagreement inside the 1969 record itself), with the experiment packages and the trail to Little West crater exactly where the account places them. The persistence of the bootprint trails — still darker than the surrounding surface decades later — also corroborates how slowly the airless regolith is reworked.
The returned samples trace to this same patch. The Mission Report places the contingency scoop within ~2 m of the LM, the bulk sample at one spot in television view near the MESA, and the documented samples just south of the +Z footpad (though the crew’s own account says north of the LM — a genuine conflict; ledger C) — all inside the churned-regolith zone the image resolves around the descent stage. Apollo 11’s sampling was too localized, and too sparsely documented (only a few rocks have a known in-situ orientation), to place individual samples on the image; but their geologic source — the West-crater-ejecta-strewn regolith — is itself in frame.
Related
Section titled “Related”- Tranquility Base (Landing Site 2)
- Lunar Module Eagle
- Early Apollo Scientific Experiments Package (EASEP)
- Passive Seismic Experiment (S‑031)
- Laser Ranging Retroreflector (S‑078)
- Apollo 11 EVA (first moonwalk)
- Lunar surface mobility in one-sixth gravity
- Lunar regolith and soil mechanics
- Apollo 11 photographic index
Sources
Section titled “Sources”- LROC NAC imagery of the Apollo 11 landing site
- Apollo 11 Mission Report (MSC-00171)
- Apollo 11 Lunar Sample Compendium